CAVEON SECURITY INSIGHTS BLOG
The World's Only Test Security Blog
Pull up a chair among Caveon's experts in psychometrics, psychology, data science, test security, law, education, and oh-so-many other fields and join in the conversation about all things test security.
How to Create a Test Online (5 Easy Steps)
Posted by Michael O'Leary
updated over a week ago
The Best Exam Development and Delivery System
There are hundreds of online testing tools available, but few are robust, easy to integrate, and convenient to use. Built with security in mind, Scorpion™ is a free exam development and delivery system that is intuitive, supportive of all item types (including multiple-choice, short answer, essay, SmartItem™, and DOMC™ items), and accessible for testing programs of any size. Scorpion's technology also facilitates custom imports and exports, making it simple to migrate, integrate, and publish with existing tools and vendors. You can click here to interact with a live exam that is built and delivered using Scorpion.
This article will cover a few important points (and you can click to jump ahead):
- How to Create a Test Online (5 Steps, Plus 2 Optional Steps)
- Important Features to Look For in Test Creation Software
- Important Features to Look For in Test Delivery Software
- Conclusion
Let's get started.
How to Create a Test Online
- Create a Scorpion account
- Go to the "Projects" page and click "Create a New Project"
- Create your exam questions
- (Optional) Add resources (like images) to your exam questions
- Export your exam
- (Optional) Enable online proctoring
- Deliver your exam
1. Create Your Account
You can create a Scorpion account in three easy steps. If you already have a Caveon ID, you can skip this section.
-
- Go to https://scorpion.caveon.com and click on “Create Free Account.”
- Fill in the required information in the sign-up form and click “Submit.”
- You will receive an email with a code. Copy and paste that code into the required field.
- Once you do that, you will be brought to the below screen. Here, you may set up Two Factor Authentication (recommended) and edit other features of your Caveon ID profile.
- When you’re ready, you may click on the “Scorpion” link at the bottom of the page
2. Start a New Project
When you log in to Scorpion, you will be taken to the "Projects" page, which contains a single project for each one of your exams.
-
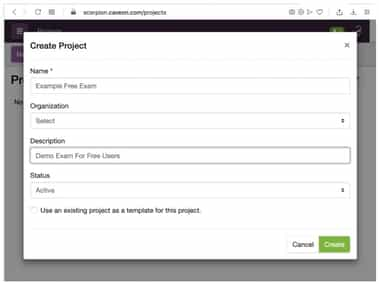
- To create a new project (exam), click the “+ New Project” button.
- Your first time in Scorpion, you’ll only need to add:
- Name: Make this whatever you want
- Description: Make this whatever you want
- Status: Active (default setting)
- To enter one of your exams, just click the name of the exam in the project list.
- For more information on setting up a new project in Scorpion, view this article.
3. Create Your Exam Questions
Scorpion makes it easy to develop exams for any difficulty. Even if you already have an existing item bank (if you do, view this section on importing items), we encourage you to play around with Scorpion's manual item creation tools before you import. Not only are there many possible item types to choose from, but you can manipulate many different variables from your dashboard. Below are steps on how to create exam questions in Scorpion. Got a pile of items already? Jump ahead to importing items.
-
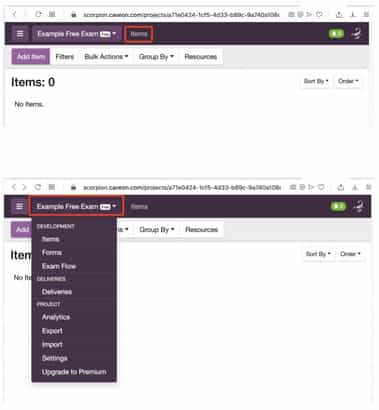
- When you enter your project, select "Items" from the dropdown menu. (“Items” is another term for “exam questions.”)
- Click the “Add Item” button to add your first question. From here, if you would like to move around to other tabs, just click the name of your exam and a dropdown menu will appear:
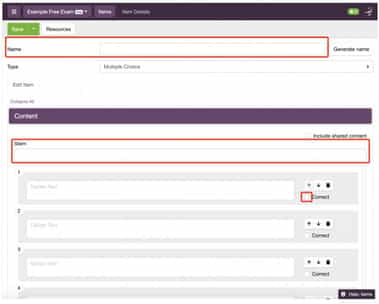
- After you’ve clicked “Add Item,” you will be taken to the Item Editor where you'll enter the contents of your item. You'll want to:
- Name the item.
- Select the item type from the drop-down menu.
- Add the stem (the "question" part of the item).
- Add the options (correct and incorrect answers).
- Click the checkbox next to the correct option.
- Farther down the screen in the Item Editor, you will see fields for "References," "Associations," and "Item Settings." You may adjust these settings based on how you would like the exam to deliver to the student. Their default settings are the standard settings for most exam deliveries.
- After you are finished entering your item’s contents, hit “Save” in the upper left-hand corner.
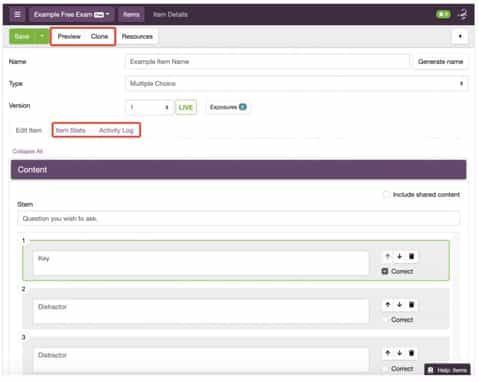
- Once you save, you will be able to preview, clone, and view item stats and activity logs.
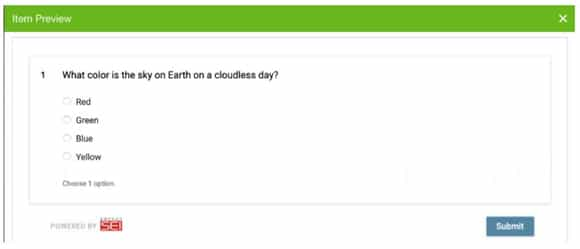
- "Preview" shows how the item will look to the examinee.
- "Clone" makes an exact copy of the item.
- "Item Stats" shows Classical Item Analysis based on deliveries of your item in Scorpion. This will be blank when the item is first created.
- "Activity Log" shows all changes to your items and which users made those changes
- For more information on creating items in Scorpion, view this article.
Importing Existing Items
Got a pile of items already? Get them imported! Scorpion supports imports from spreadsheets and QTI standards. You can learn how to connect your external items to Scorpion in this article. For advanced item types and items with complicated delivery needs, Caveon’s attentive customer support can help you bring them into Scorpion without losing what makes those items unique and powerful.
4. (Optional) Add Resources (Images, Video, Etc.) to Your Test
-
- The "Resources" button is where you will enter your image, audio, and video files. The "Resources" button can be found in two places: in the "Items" menu (your item bank) and inside each item's editor page as well.
- A pop-up window will appear
- Click “Browse” to locate the files on your computer, then click “Upload.” Once an asset has been added to the "Resources" tab, it can be embedded in an item’s stem or options (this is done inside the item's editor).
- Use SmartEmbed, not URL only. Now you can paste that link into your item in the item editor.
- After you click the “Save” button in the upper right-hand corner, you can preview the item, and you’ll see exactly how your asset will deliver to your student.

5. Export Your Test
-
- Go to the “Export Menu” tab.
- Here, you can export your items in a variety of formats for use in Scorpion or in other delivery systems if you prefer. For more information on integrating Scorpion with your LMS, view this article.
6. (Optional) Enable Online Proctoring
Scorpion’s proctor console contains detailed event logs and warnings based on candidate behaviors, allowing proctors to pause, stop, or even suspend tests. You can enable online proctoring within your Free Scorpion account. We’ll touch on it below, but you can learn more about proctoring and proctoring requirements in Scorpion in this guide. You can also learn more in-depth information on how to use Scorpion’s proctoring tools in this article, and more about bulk proctoring options in this article (page 9).
Launching Exams with Proctoring Via Scorpion
-
- Candidate logs into the proctor’s video conference (Zoom, GoTo, etc.) and shares their audio, video, and screen with the proctor.
- Proctor logs into Scorpion and goes to the "Delivery" tab.
- Proctor clicks the black “Proctor This Exam” button at the bottom of the page, which will launch the proctor controls in a new tab.
- Proctor copies the link from the field directly beneath the setting called "Enable a URL where users can launch their own exams" on the "Delivery" tab. Note: If this setting is not enabled, the proctor will need to enable the setting and click the "Save" button in the upper right-hand corner before the link will appear.
- Proctor pastes the launchpad link into the chat area of the video conference tool and instructs the student to click on it.
- Proctor navigates to the tab opened for the proctor controls in step 3 above.
Proctoring Through Your LMS
You can proctor exams that are made in Scorpion through your LMS as well. Learn more about proctoring with your LMS or other integrations in this guide and this in-depth article.
-
- Proctor clicks on each student’s name and clicks the “Resume” button to allow each student to enter and begin their exams.
- Students take the exam. Proctor has the ability to pause/stop the exam if needed.
- When a student completes the exam, the proctor closes the VCS.
7. Deliver Your Exam
-
- In the "Deliveries" menu, you can get your exam ready for final delivery to your students or candidates. You have many options, including the implementation of time limits, answer changes, item feedback, comments, and other customizable options and security features.
- Scorpion allows you to deliver your exam, connect to your Learning Management System (LMS), enable online proctoring, review your test results, and more. You can learn more about these and other options in this guide, or view in-depth instructions on how to publish your exam in this article.
Important Features in Test Creation & Test Delivery Software
No matter the test development or delivery software you choose, make sure your software includes these important features when creating your test online:
Important Features in Test Creation Software
- Item Diversity: Your software should include all the available item types: Multiple-choice, true/false, short answer, essay, matching, build list, hotspot, likert, scale, DOMC, AIG, SmartItem™ technology, DOMC™ items, and more. Make sure you aren’t limited by your test development options.
- Role-Based Security: Security is key during test development. Leverage roles like Admin, Item Writer, and Item Reviewer to show and hide important content from the appropriate parties.
- Custom Workflows: Make sure you can push your items through customizable workflows during development to simplify collaboration. Look for options like advanced sorting, color coding, and configurable phases and statuses.
- Powerful Review Tools: Make sure your test development software allows you to collaborate remotely to conduct Angoff, CARD, content, and copy reviews. Make sure these options are secure with secure access and content restriction settings.
- Automated Form Builders: You should be able to automatically split and balance forms using a form builder. That way you can drag, drop, and publish forms based on item review scores or Automatic Classical Item Analysis.
- Multimedia Support: Make sure your item development software includes the option for audio, video, and image assets in the item stem and item options. You should also be able to share that content across items, if needed.
- External Environments: Make sure innovative, performance-based testing is possible with a software that supports an external item type and allows API calls to external environments.
- Psychometric Support: You should be able to conduct automatic classical item analyses including N, P-value, and correlation—by item version—using data drawn directly from your exam deliveries.
Important Features in Test Delivery Software
- Proctor Support: In the event of a testing irregularity, your proctors should be able to pause, stop, or even suspend tests. The proctor console logs available should provide detailed events and warning flags based on candidate behaviors.
- Item Watermarking: Item watermarking makes it possible to identify any testers who have stolen and shared your proprietary exam content. For example, Scorpion's technology supports three different types of item watermarking.
- Integrations: Your test delivery software should offer a full suite of APIs and webhooks, which are available for almost every exam delivery use case. Full LTI support with learning management systems should always be available.
- Adaptive Exams: You should be able to quickly and easily build adaptive exams by just selecting your delivery format from a drop-down menu.
- Custom Results: Not necessary (but a big perk) is the ability to Customize your results pages to look and feel the way you want them to. This will make it a lot easier when you have to analyze your test results.
- Secure Deliveries: Most importantly, you should be able to control user access at the administration level, then watermark your content and control user and proctor access during delivery. More secure deliveries means you’ll have to respond to fewer incidents and issues during your testing window.
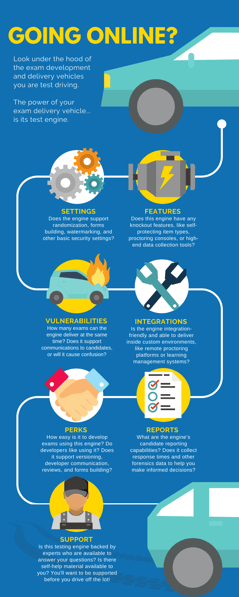
No matter which test development and delivery software you choose, make sure these features for online test creation are top-of-mind (keep this infographic for easy reference). These options, and more, are available in Scorpion Pro. You can view and compare all the Scorpion Free and Scorpion Pro features here.
Conclusion
With all the online testing tools available, there are few that are robust, easy to integrate, and built with security in mind. You should look for an exam development software that best supports your program’s specific needs.
This article specifically walks you through Caveon Scorpion’s 5 simple steps (plus two optional actions) that make it fast and easy to create a secure online exam:
- Create a Scorpion account
- Go to the “Projects” page and click “Create a New Project”
- Create your exam questions
- (Optional) Add resources (like images) to your exam questions, if desired
- Export your exam
- (Optional) Enable online proctoring
- Deliver your exam
Learn more about Scorpion’s powerful (and free) tools here and interact with a live exam here—and if you have questions about transitioning to online testing, view our ultimate guide or reach out.
Michael O'Leary
View all articlesAbout Caveon
For more than 18 years, Caveon Test Security has driven the discussion and practice of exam security in the testing industry. Today, as the recognized leader in the field, we have expanded our offerings to encompass innovative solutions and technologies that provide comprehensive protection: Solutions designed to detect, deter, and even prevent test fraud.
Topics from this blog: Exam Development K-12 Education Test Security Basics Higher Education Online Exams
Posts by Topic
- Test Security Basics (34)
- Detection Measures (29)
- K-12 Education (27)
- Online Exams (21)
- Test Security Plan (21)
- Higher Education (20)
- Prevention Measures (20)
- Test Security Consulting (20)
- Certification (19)
- Exam Development (19)
- Deterrence Measures (15)
- Medical Licensure (15)
- Web Monitoring (12)
- DOMC™ (11)
- Data Forensics (11)
- Investigating Security Incidents (11)
- Test Security Stories (9)
- Security Incident Response Plan (8)
- Monitoring Test Administration (7)
- SmartItem™ (7)
- Automated Item Generation (AIG) (6)
- Braindumps (6)
- Proctoring (4)
- DMCA Letters (2)
Recent Posts
SUBSCRIBE TO OUR NEWSLETTER
Get expert knowledge delivered straight to your inbox, including exclusive access to industry publications and Caveon's subscriber-only resource, The Lockbox.
